
You are currently browsing the monthly archive for January 2013.
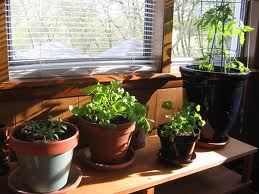
Consider container gardening if you don’t have space for a vegetable garden or your present site is too small. Some people prefer container gardening to outdoor gardening as soil-borne diseases, pests and poor soil can be drastically reduced. Container gardening is for anyone and everyone who wants their patio or porch boasting fresh, nutritious homegrown vegetables. In addition it makes good for attractive plantscaping.

Wooden container
Crops that bear fruits over period of time, such as tomatoes and peppers, and vegetables that take up less space, such as carrots, radishes and lettuce, are ideal for containers. The amount of sunlight an area of your house receives will be determinant factor in considering what crop to grow.
Containers
Any container that provides drainage can be used to grow vegetables but choosing the right size is very important. Based on the type of plant you are growing you have to select an appropriately sized container. Plants with large root systems require wider and deeper containers. But I have experienced that larger containers are better as they can handle more soil which means more retention of water and hence easier maintenance.
As long as the container has the following prerequisites you are good to go:
- Big enough to support the fully grown plant
- Good drainage system to avoid rotting of roots
- Not contain or have contained any toxic material that will damage plants
- Hold soil without spillage
As for material of the container keep the following in mind:
- Plastic pots may deteriorate over time under UV sunlight
- Un-glazed Terracotta (clay) pots dry out rapidly
- Glazed ceramic pots are good but require several drainage holes
- Wooden pots are of course susceptible to rot. Cedar and redwood though are pretty much rot resistant but be sure to avoid wood treated with creosote or pentachlorophenol wood preservatives as they may be toxic to plants and humans.
- Use light-colored pots in hot climates
Soil Medium
The soil as for any soil in which plants are to be grown has to drain quick yet retain enough moisture to keep the roots evenly moist. A fairly lightweight mixture is ideal container gardening. The container medium should be porous enough as roots need air and water.
Packaged soil medium is available at your local garden centers and make good container medium as they are relatively lightweight. Leave 2-3 inches at the top so that you can add mulch/compost at the top once the seeds germinate.
If your requirement is large, you can create your own seed starting soil mix by combining even parts of vermiculite or per-lite with peat moss, milled sphagnum moss, coir or well-screened compost. Make sure to sterilize them all.
At any time after the seeds sprout you can add fertilizers but if organic is the way you’re growing, avoid chemicals and other hazardous substances. Compost will give you as good results as other fertilizers while being entirely safe ad hygienic.
Other Factors to Consider
Planting: Plant as you would in a regular garden. Follow the instructions on the seed packets if you’re starting from seeds or read these transplanting tips if you’re using a transplant.
Sunlight: Most plants require a minimum of 5 hours of direct sunlight a day. 6-8 hours will be ideal for most plants. Check the seed packets to see if they need full sunlight or partial sunlight.
Watering: This requires particular attention. You wouldn’t want your plants withering and drying out in the sun. The amount of soil in containers is small compared to gardens hence they dry out much quicker. Water once or even twice daily as required per plant. Water till it runs out from the drainage holes.
Consider an automatic drip irrigation system if you are away a lot or maybe it’s time to ask your neighbor for a favor!
Here’s a table that will help you with growing vegetables in containers:
| Vegetable | Light Requirement | Minimum container size | Inches between plants | Day from seed to harvest |
| Bush Beans | FS | 2 gal. | 2-3 | 45-60 |
| Beets | FS/PS | ½ gal. | 2-3 | 50-60 |
| Carrots | FS/PS | 1 qt. | 2-3 | 65-80 |
| Cabbage | FS/PS | 5 gal. | 12-18 | 65-120 |
| Chard, Swiss | FS/PS | ½ gal. | 4-6 | 30-40 |
| Cucumbers | FS | 5 gal. | 14-18 | 70-80 |
| Eggplant | FS | 5 gal. | 1/ container | 75-100 |
| Kale | FS/PS | 5 gal. | 10-15 | 55-65 |
| Lettuce | PS | ½ gal. | 4-5 | 35-40 |
| Mustard | PS | ½ gal. | 4-5 | 35-40 |
| Onion | FS/PS | ½ gal. | 2-3 | 70-100 |
| Bell Peppers | FS | 2 gal. | 1/ container | 110-120 |
| Squash | FS | 5 gal. | 1/ container | 50-60 |
| Tomatoes | FS | 5 gal. | 1/ container | 55-100 |
| Turnips | FS/PS | 3 gal. | 2-3 | 30-60 |
FS- Full Sun, FS/PS- Full Sun, tolerates partial shade, PS- Partial Shade
When the cold weather starts to give way to warmer brighter days you know the time to move your plants into the garden is nigh. Transplanting is an art that can be learnt. Hope you have read Transplant Shock: Understand Your Plants Better to get a good idea of why the following tips and pointers will help you transplant better.
1. Get your garden ready and your plan intact!
Get your garden space in order. Plan out where each vegetable is going. Each type of plant has a different requirement in terms of amount of sunlight, water and nutrition needed and you have to take this into account. Seed packets contain details like whether the plant requires a shaded area or direct sunlight, distance between plants etc.
You have to be absolutely certain that the temperature outside is warm enough to sustain the plants and that the plants new living area is ready. There is nothing to gain but all to lose if you transplant too early so I stress again, do it when the time is right! Plants like tomatoes, eggplant, peppers, squash thrive under direct sunlight whereas lettuce, peas, carrots, kale, swiss chard don’t mind some shade. Do some research and don’t hesitate to ask our experts!
2. Harden off your plants.
Your young pampered (I hope) seedlings need time to adjust to the cruel (just kidding!) outside world. This process is called hardening off and has to be done to make sure that when the time comes to move them outdoors, they will survive. Hence you have to begin this a minimum of 2 weeks before the planned date of the transplant.
In short, to harden off, take them outside and place them under shade for 3-4 hours. Gradually increase the time outside by 1-2 hours a day. In a week’s time you can place them under direct morning sunlight for a few hours and thereby gradually increase the time spent outside.
3. Transplant on a dreary cloudy day. No really!
It has been proven that to minimize transplanting effects it is best to move your plants outdoors when the weather outside is mild, still and fairly overcast, so plan for a late afternoon or an early evening to transplant. According to the University of Minnesota Horticulture Extension Service, plants will mostly wilt the day after transplant but will recuperate in a few days.
4. Treat them like you would newborns.
Yes, their roots are very delicate which is why utmost care should be given while transplanting. Gently lift t

Lift the whole root system with soil off
he entire plant from its root balls and place them into its new plot. Do not tug the plant from the top to remove it. If you have to you can turn the pot upside down to dislodge the plant but be gentle. You can also dig up the soil around and then lift the plant off.
5. Water them religiously!
Pay considerable attention to newly transplanted plants to ensure that they do not dehydrate and die off. It is inevitable that a few of those tiny hair-like water and nutrient absorbing structures will get hurt in the process of transplanting and their capacity will have decreased. Therefore sufficient moisture in the soil is mandatory at all times.
Most of you at some point have had to transplant trees

A plant wilting due to transplant shock!
, shrubs or vegetable plants from the comfort of warmer indoors during cold weathers to outdoors when the sun starts shining brightly on a daily basis. The process is pretty much mundane to most but it is nevertheless a petrifying experience for anyone because there is a possibility of the transplanted plant undergoing a transplant shock. Yes sadly, transplant shock is a big reality in the plant world but is very much manageable. The bottom line is that there are things you can and should do to help out the transplants so that the probability of a successful relocation is good. Before you read tips or go through step by step instructions, it would be good for you to understand what exactly happens to a plant when it is transplanted. Knowledge never hurts, they say!
The Root of the Problem
It is inevitable that the plant you move will experience a transplant shock to some extent. This is just the plant reacting to its move. Just how when you finish eating food, you actually haven’t completely finished because there will always be minute bits remaining… Well, bad analogy, but I hope you get the gist. Now, by treating the plant carefully like you would your kids (I’m strongly assuming) you can minimize the shock such that the plant can cope with the change easily. Ok, back to the subject.
This shock is generally due to damage to the roots. The thickest roots are closest to the root ball below the stem of the plant but these are not the ones you should be too worried about. The thin fragile ones far from this root ball are more important in that they are responsible for doing the actual work which is absorbing nutrients and water with the help of tiny hair like structures. While transplanting, these tiny hairs are damaged, usually by being cut during the uprooting of the plant or by drying out (it has been reported that as less as 3-4 minutes of exposure to air kills them) or simply by being jarred and jostled around while transplanting. If these feeder roots are damaged naturally the plant suffers from lack of nutrients and water and thus goes into a transplant shock.
Besides this major root issue, plants can sense changes in temperature, wind speeds, light intensities and other physical conditions and take time to acclimatize themselves, like any other living organism would! This whole acclimatization process also affects the rate of nutrient and water uptake. Ha, I can tell that by now you have a few ideas of your own to make your next transplant a success. Told you, knowledge never hurts!
In any case the following symptoms are likely to follow. The plant may grow rapidly for a short time and then abruptly stop growing. Or it may grow reservedly all season and produce buds that barely break into stunted small leaves. In very severe cases the buds may not break at all! There may be unusual development of leaves and stems in some transplants undergoing shock. Leaves that immediately start browning at the tips are also a sign of transplant shock. More often than not, transplant shock symptoms mimic those of insect trouble and plant diseases.
No reason to fret though, the success rate of transplants is high when done right!
Winter storms are still a threat and it’s chilly outside. Seeds planted outside won’t grow in this cold! But spring is nearly here and it’s the perfect time to start growing indoors. You can get a head start, and when summer does arrive you will be first in town with fresh veggies and blooming flowers.
Decide on what you want and buy the seeds!
It’s possible for you to buy young plants from home and garden centers and continue to grow them indoors. It’s more expensive than buying seeds though. Not only that, the varieties of seeds available online is much more! This idea is backed by Melinda Myers, a Milwaukee-based gardener and author or more than 20 horticulture books. So I guess that concludes any arguments if there are any! You may get more seeds than you can handle but no issues. Just store them away in a sealed packet in a cool and dry place for next year.
Your seed packets will have a lot of useful information and will mention if you can grow it indoors. In general though, tomatoes, peppers, broccoli, eggplants, cauliflower, melons and squashes can all be started successfully indoors.
Get containers.
A number of items make for good indoors growing. Empty yogurt cups, flower pots, cardboard boxes, egg shells etc. are easily available container material that will get the job done. You can be a little innovative by placing newspaper loosely over the container you’re using so that when it’s time to transplant you can place the entire newspaper filled with soil mixture into the garden (newspaper is biodegradable). You may reuse old containers, just be sure to disinfect them by cleansing with a diluted bleach solution (1 cup of bleach: 9 cups of water). In fact, you
Next to a sunlit window
should disinfect everything you use to avoid fungi or diseases from infecting your plants.
Another necessity with the containers is that they should have adequate space for roots to grow as the plant gets bigger and that they let excess water drain out.
A place to grow
Seeds need warmth to sprout. Pick a convenient spot; the basement or a window that lets in a lot of sunlight for warmth. Or place the containers next to the refrigerator or use a heating pad. Once the seedlings germinate they require light so move it into an area which gets sunlight or provide artificial light.
Growing medium
Seeds are self-starters; they contain all the nutrients necessary for them to germinate. They require constant moisture, plenty of air space and warmth. The soil should be soft enough for the young roots to penetrate so don’t use garden soil as it hardens into a thick mass.
You can create your own seed starting soil mix by combining even parts of vermiculite or perlite with peat moss, milled sphagnum moss, coir or well-screened compost. Make sure to sterilize them all.
Or you could buy bagged seed-starting mix. Grow in the starting medium till true leaves appear. Then move them into a nutrient rich organic soil mixture. This is important because at this stage the plant needs all the important nutrients, water and loads of light.
Sow the seeds at the right time
Sow the seeds at least an inch apart or as you deem fit. Your seed packets will have a lot of information with recommended planting times etc., so make sure to use it. Make a calculated decision about everything from moisture and warmth for seeds to enough light indoors for young plants to transplanting them outdoors.
Watering
“It’s almost impossible to water correctly, so drainage holes in your containers are critical”, claims Myers. Yes, watering is the trickiest part of indoor gardening. You can use a mist bottle for newly planted seeds. Basically, moisten the soil without washing away the seeds. Check for moisture levels every day and covering with a damp newspaper or plastic helps keep in the warmth and moist.
Lighting
Most gardeners prefer to supplement sunlight with artificial inexpensive fluorescent lights which they testify work well. It’s important to rig the lights so as to be able to move them up and down. It’s appropriate to keep the artificial light source 3-4 inches above the plant as they grow. Be careful to not use incandescent bulbs because if they are that close to the plant the heat from it will destroy it. Provide proper amounts of light, in general 16-18 hours of light will do.
Make notes
This is very important if you are starting a lot of seeds. It’s not hard to forget which seed is what. They all look quite the same until their true leaves sprout. Besides, most of us are absent-minded. No harm in labeling your containers, noting down planted dates etc. Believe me, no harm at all! Also next year your task will be simpler and you can compare and improvise!
Sowing timetable
Here’s a general sowing pattern for various plants. Check your seed packets though, different varieties act differently! To know when to start indoors, find out the approximate last date of frost in your area and count backwards from that date the number of weeks indicated on your seed packets (or as indicated below) as the time required for maturity.
- 12-14 weeks: onions, leeks, chives, pansies, impatiens, coleus
- 8-12 weeks: peppers, lettuce, cabbage-family plants, petunias, snapdragons, alyssum
- 6-8 weeks: eggplants, tomatoes
- 5-6 weeks: zinnias, marigolds
- 2-4 weeks: cucumbers, melons, okra, pumpkins, squash
Good luck!
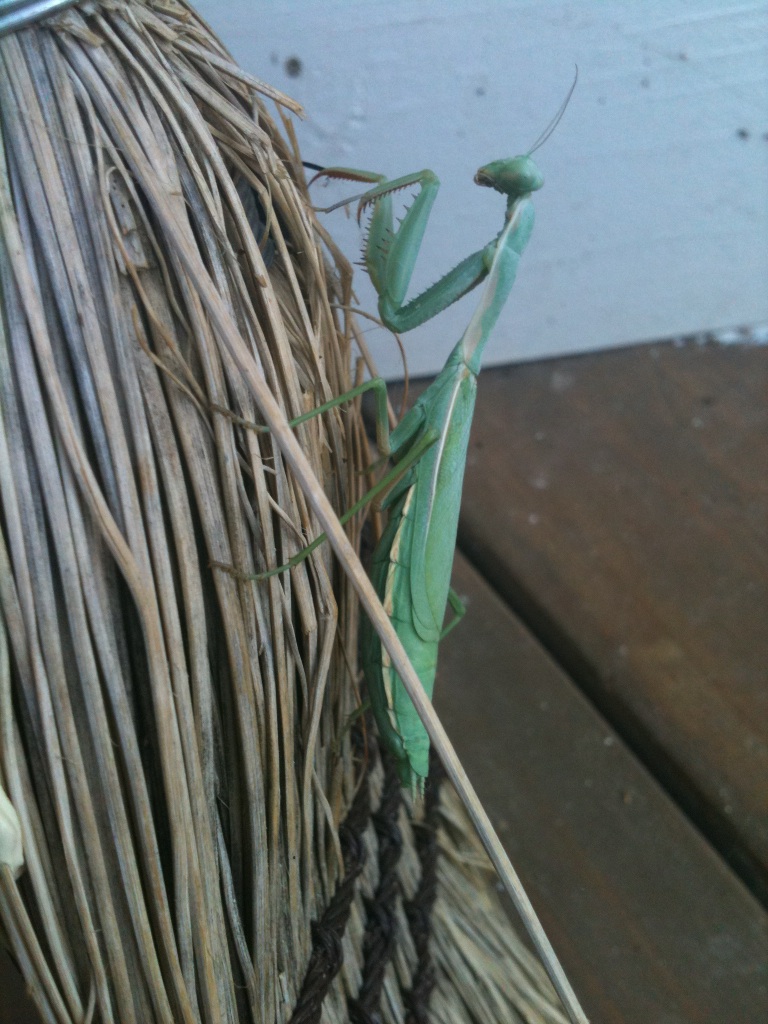
Elegantly poised the mantis preys!
Oh eloquent Praying Mantis, what have ye in store for me? If you observe this creature for a while you would see why they are associated with stillness and peace. Yes, among myth and folklore the praying mantis is a popular subject, and the Chinese have lots of positives to say. A mantra thus reads, “The mantis never makes a move unless she is 100 percent positive it is the right thing to do”. For a mantra this is very self-explanatory I must say. The praying mantis symbolizes meditation, contemplation, direction and even destruction depending on which part of the world you are in! An old French belief was that praying mantises would help lost children home, by of course pointing in the right direction. Now you know what your kid’s next pet could be!
Good thing about mantises, apart from getting some divine inspiration, is that they have huge appetites and would be very handy to have in a garden or even at home if weird creatures aren’t new to your household. I’ve heard their idea of a Thanksgiving dinner is a platter of red meat (well-done of course) with some flies. Of course not! They do like flies though and eat various household and garden insects such as worms, bees, mosquitoes, roaches, aphids, crickets, grasshoppers, beetles and spiders.
Beware though! They are carnivorous and feed on anything they can capture and devour your beneficial insect buddies too! I feel most sorry for the cute little lady bugs.
Praying mantises don’t really stick to the same place for long so you won’t really have a problem with having too many. Their young ones are called nymphs, resemble the adult in structure, are about 5 mm in length and eat voraciously too, sometimes even their siblings. How we wish our children were like that!
Take a look here at this greenish grey colored beauty captured on the underside of a basil leaf at the community garden at Scottsdale, Arizona. We noticed it munching on a bee already in its clutches (lodged tightly within its claw-like forelimbs). As its meal got smaller, it tucked the remains under its elbow and moved it back and forth to its mouth until it was done! Or we thought so! It then licked off its wings the bee’s juicy remains! Feeling satisfied it continued to its favored head-upward praying stance we all behold.
Happy 2013! The new growing year has begun and nothing is more rewarding than harvesting the winter produce and planning your garden space for the year ahead. Take some time to reflect on things that have worked out well for you and things that haven’t quite and make a resolution to become a better gardener! After all if we do not learn from mistakes, we are not progressing. Anyways let’s just enjoy the beauty of nature and our gardens (?). Just kidding, I’m sure your garden is pretty!
If you haven’t done the following, January is your last chance to:

This isn’t tempting enough?
- Plant bare root trees and shrubs
- Spray dormant shrubs
- Monitor freeze warnings and take measures such as covering plants with perforated plastics.
- Prune roses and deciduous fruit trees
- Plant summer bulbs
Here is a list of vegetables you could try out this time. That’s if you haven’t already!
1. Garlic: It can be sown directly into the soil and it won’t be affected by the frost as they are very hardy to cold temperatures.
2. Rutabaga: Sow directly into soil, harvest from May.
3. Radish: Sow directly into soil, harvest from March. Suggested variety: Purple Plum Radish
4. Okra or Ladyfinger: Grow indoors initially in trays and then plant outside in 4-6 weeks. Harvest from June. Suggested varieties: Clemson Spineless Okra, Star of David Okra
5. Parsley: Sow directly into soil. Harvest from May. Suggested varieties: Santo Coriander, Moss Curled Parsley
6. Lettuce: Sow directly into soil in a nice shady place or better start growing in a seed tray indoors and transfer outdoors once plant grows a bit. Harvest from late February. Suggested varieties: Yugoslavian Red Butterhead Lettuce, Jericho Lettuce, Schweitzer’s Mescher Bibb Lettuce
7. Cucumber: Sow directly into soil. Harvest from May. Suggested variety: SMR 58 Cucumber
8. Scarlet Runner Beans: Sow directly into soil. Harvest from May.
9. Beetroot: Sow directly into soil. Harvest from May. Suggested varieties: Cylinder beet, Chioggia Beet
10. Amaranth: Sow directly into soil. Harvest from May.
11. Onion: If you plant onion seeds indoors in propagators they will be adequately sized come warmer weather.
12. Potato: You can start your early crop potatoes indoors or on a window-sill but make sure they do not get too damp.
13. Chives: Sow directly into soil. Harvest from May.
14. Eggplant: Start growing in seed trays indoors and plant outside in 4-6 weeks. Harvest from June. Suggested variety: Ichiban Eggplant,
15. Tomatoes and peppers: Get ahead and start growing tomatoes and peppers indoors and since they take 6-8 weeks to reach transplant size it will be perfect come March. Suggested varieties: Juliet Tomato, Super Fantastic Tomato, Numex Big Jim Pepper
This list is specifically suited for all you people experiencing cold weathers now and hope to see warmer times by late February. Get all your required seeds and any assistance at our online store. And do plant only heirloom seeds henceforth! Once again a Happy 2013 to you and your garden!
Weeds are a problem every gardener has to face. Weeds are to gardeners as injuries are to sports people. Well, not quite but weeds are like an occupational hazard! And like most problems there are solutions, some of them not quite pleasant as the other. Taking that into account I would like to divulge the organic view of taking care of weeds.
The bigger the weeds get the harder they are to control. They use up the nutrients and water that your plants need! So get into the habit of a once-a-week intruder patrol to cut down your weed problems. Using the right (organic of course) tools and techniques you will definitely cut down weed growth making it a manageable- maybe even enjoyable- task!
The organic way requires diligent work and aren’t we all quite the buzzing bees in our gardens. The organic way will be very effective if carried out right. Here are ways to organically prevent or remove weeds from your garden. You should use a combination of the below techniques for best results.
Mulch
Mulch as you know is a layer of material applied to the surface of the soil. Yes, mulching inhibits growth of weeds by not allowing them enough light. And no light means no chlorophyll which in turn means no weeds! The weeds that do manage to get through the thick layer of mulch will be easily removable as their roots will be shallow.
Of course you’re going to be using organic mulches -straw, grass clippings, leaves, shredded bark, sawdust, kitchen scraps- which will decompose in time to nourish the soil. This will serve as a fairly effective weed barrier. Use plenty of newspapers or kraft sheets (paper used to make grocery bags) or cardboards under the mulches, for even better weed protection.
A 6-inch layer of shredded newspaper used at the start of one season allowed no more than 8 weeds per square yard to sprout for 2 seasons without renewing the mulch layer, in a study conducted at the University of Vermont back in 1992-1993. Weeds haven’t learnt much since then so I’m sure these results are still valid!
Hoeing
Hoeing will work effectively when the weeds are still small and haven’t bloomed yet. Annual weeds die when their stems are severed from their roots just below the soil surface. With a sharp hoe you can easily cut those weeds down.
For best results go for a swan neck or oscillating hoe instead of the traditional square-headed garden hoe and to avoid backaches hold it as you would a broom- with your thumbs pointed upward.
Corn Gluten Meal
Corn gluten is 100% natural. It is a byproduct of the wet-milling process and was accidentally discovered to be an effective weed controller. The awesome thing is that apart from suppressing growth of weeds, it will feed your garden as it is a source of nitrogen. Also it is not at all harmful to humans, animals or birds.
Sounds too good to be true? Here’s the catch. It will prevent weed seeds from germinating roots, but once the weeds have gone beyond the sprout stage corn gluten will not affect them. Also, they cannot distinguish between weeds and crop seeds. So don’t use them where you have just planted other seeds. They are best used in established lawns or perennial garden beds.
Solarization
The sun can do wonders for you in the garden. Apart from the obvious it can help you get rid of persistent weeds if you leave your bed fallow for six weeks in the summer. Maybe you can try this on a small part of your garden. You don’t want to be out of action for so long.
Start pulling, hoeing or raking out as many weeds from your garden bed sometime in late spring or early summer. Then wet the soil and cover it with plastic using weights or by burying the edges. Leave the plastic as it is for those six weeks. When you remove the plastic you will see the fruit of the sun. Rather you won’t see much as the sun will have cooked all the weeds that would have sprouted.
Follow these methods persistently and there’s a good chance that in a few seasons you will have repelled these invaders for good!
Every once in a while we wonder how good our soil actually is. Be it that you get a decent yield or that you seem to be growing lesser than they do in the Sahara desert! But before you jump into the conclusion that you need a soil test, read twice!
A soil test reveals nutrient and contaminant content, composition, acidity and pH level. It can also determine fertility, expected growth potential of the soil, reveal nutrient deficiencies and so on. Sounds great! You should be getting your soil tested immediately right? How you could do with all these numbers you may think.
Well here’s the thing. There’s only so much you could do with those numbers. Just say for example, you find out that you have a deficiency in one of the major nutrients nitrogen. Now nitrogen content in your soil can easily be enhanced by adding fresh compost or ground coffee. When your crop comes out you could still be surprised that it hasn’t really become much better. Yes, Mother Nature is a hard nut to crack and she is sort of unpredictable. So even though a soil test gives an insight of the quality and characteristics of your soil, it’s unreasonable to expect to an awesome yield after rectifying key shortcomings.
Don’t be downtrodden now! You can save that soil test money and evaluate (to some extent) the soil yourself. Vincent Lazaneo, an urban horticulture adviser believes the first question to ask yourself before you get a soil test is “Why you want a soil test?”! He says that if plants or weeds are growing in the area then you may not need a test. It would be cheaper to just add a little fertilizer and compost to enhance your plant performance. If the soil is too sandy you could add an organic amendment to help it hold up water. If it’s the clay-type soil, adding compost would help loosen the soil up thereby helping roots get nutrients easily.
If you do eventually decide to get a soil test done, send it to a lab and insist on getting an interpretation of the results. A number, by itself, doesn’t really tell you much. It can vary, depending on what substance the lab used to extract the various nutrients from the soil, warns Lazaneo.
Also, the first two things a test should indicate is the soil’s pH- how acidic or alkaline it is- and it’s salinity. pH affects the availability of nutrients to plants and most plants grow best in slightly acidic conditions (each plant is different so check before making all your soil acidic). If your pH is too high, you can correct it by adding soil sulfur or peat moss. Salinity test as the name indicates tells you how salty the soil is. Plants like us humans do not like salty water. Enough water though can wash away the salt.
To test or not to test IS the question!
