You are currently browsing the monthly archive for November 2013.
Nothing beats the taste of freshly picked ripened homegrown tomatoes which are, without a doubt, superior to store-bought produce. However, as the end of the season nears and temperatures start to decline there are invariably plenty of green tomatoes left on plants that didn’t quite make the cut.
What to do with all of those unripe tomatoes that were left on the plant, you must be pondering! These, too, will ripen over the next few months if stored properly. They won’t be as tasty or juicy as the ones you’ve been enjoying all season long, but they will be real tomatoes from your own garden, and still way better than anything you can buy in a supermarket from November through May.
What makes tomatoes ripen?
Contrary to popular belief, windowsills aren’t the best place for ripening tomatoes. If you’ve noticed, your tomatoes often start to ripen on the side opposite to the side exposed to sunlight although not all varieties show this nature. So, a good amount of light is not required for ripening, furthermore it is known to harden the fruits’ skin.
On the other hand, temperature is an important factor. The warmer the temperature the quicker a tomato fruit will ripen. Hence, ripening can be slowed down by placing tomatoes in a cool area or sped up by placing in moderate warmth.
Another factor that is crucial in the ripening of tomatoes is ethylene gas. Ethylene is actually naturally released by ripening fruits such as bananas, apples and tomatoes. So, placing a ripe banana or apple among green tomatoes helps speed up the ripening process.
Different methods
Here are several techniques you can employ to ripen tomatoes:
1. Jar method: Place a ripening banana along with your green tomatoes in a glass, ceramic or plastic jar. Do not overfill the jar, or the tomatoes might get bruised. Screw the lid tightly and leave it in a warm, semi-humid environment, out of direct sunlight.
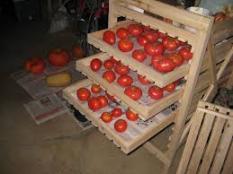
2. Cardboard box method: Line a cardboard box with newspaper and place the green tomatoes on top in a single layer with a little space in between. Placing ripening bananas along is optional. Cover with another layer of newspaper and place the box out of direct sunlight, in a warm and low humid environment such as a basement, insulated garage, or enclosed porch.
3. Paper or plastic bag method: Put 5-10 green tomatoes in a paper or plastic bag with a ripening tomato, banana or apple and place in a warm, low-humid place. Punch in a few air circulation holes in each plastic bag being used. Paper bags are naturally semi-permeable (meaning they allow to an extent air to diffuse through them).
4. Hang the whole plant method: This method is useful at the end of the season when a frost is forecast as frost is damaging to tomatoes making them turn dark green and unable to ripen. Gently pull up the whole tomato plant and hang it upside down in a garage or cellar where temperatures remain above freezing. This method supposedly gives better tasting tomatoes than the other methods.
Tomatoes ripen from the bottom up and the inside out, so don’t put tomatoes on a windowsill to ripen because they will only turn red, but not ripe. They will remain green inside.
The best results are got when the tomatoes are already showing a yellow-orange tinge which indicates that they are ready to ripen. You can be successful with turning fully green tomatoes into ripe ones but they will take longer and may not be so flavorsome.
It takes about 3-4 weeks for ripening at lower temperatures 10-15 deg. C (50-60 deg. F) whereas it can take just 2 weeks at 18-21 deg. C (65-70 deg. F).
Watch out for:
Diseased or damaged fruit is the biggest problem when ripening tomatoes indoors. Avoid piling them up to prevent and protect them from being bruised or squashed. Ensuring adequate air circulation will prevent molds from forming.
Every day or two check up on them and remove anything suspect. Select only the very best tomatoes for ripening as any lower grade tomatoes may be suffering from a disease such as blight.
Keep your zucchini, crookneck and pattypans safe!
Every summer, as you well know if you have grown any kind of squash, the fruit can sometimes develop a mushy, soft, rotting spot at the blossom end.
Reasons:
–The fruit develops a disease that is similar to tomato blossom end rot which happens when the water given to the plants is uneven which creates a calcium deficiency. This can be prevented by mulching to keep the soil moisture even, and by watering regularly to give the plants adequate water.
–The second reason is that the flowers themselves develop a fungus and rot back into the fruit. This happens especially in areas or gardens that have high humidity, or where gardens are watered from above and plants are kept wet for long periods of time.
Solutions:
In either case mentioned above, the answer to the problem is simple:
-Ensure even watering, adequate and be sure to not indulge in over-fertilization, maintain appropriate pH between 6-6.5 for better calcium uptake and add a calcium rich spray or supplement to the soil.
-Remove the flowers once the young fruit has begun to swell and grow. After you remove the flower, if you see any decay starting, using your fingernail gently scrape the end of the fruit to remove any decaying material. A small scar will form where you did this, but the rot will stop and your squash will develop into mature fruit with no further problems.
Common name: Pickleworm
Scientific name: Diaphanis nitidalis
Distribution
Pickleworms are tropical insects and cannot tolerate cold temperatures. These pests are predominant in the southeastern United States, ranging as far north as Connecticut, Illinois, Iowa, Kansas and New York. They overwinter in Florida and Texas, where they may be active year round. They are known to spread northward late in the season.
Lifecycle and Description
Adults: The pickleworm adult moth is a small flashy moth with wide triangular wings and a wingspan of 1 ¼ inches. The wings are mostly iridescent brown with a central band of semi-transparent yellow. The tip of the abdomen contains a cluster of brush-like hairs. Pickleworm moths are generally inactive during the day and peak flight activity occurs typically 3-5 hours after sundown.
Eggs: Adult moths lay tiny eggs directly on growing areas of the plant, such as new leaf buds, flowers and shoots. Eggs are white initially, but change to yellow as they mature. Eggs hatch in about 4 days.
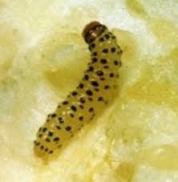
Larvae: The young larvae of pickleworms are thin white caterpillars with numerous black spots. As they mature though, they get plump and darker in color while losing their spots. Color is dependant largely on the insect’s food source. When mature, larvae often attain a length of 1 inch. Pickleworms undergo 5 larval instars before pupating.
Pupae: Pupation usually occurs in a leaf fold, and dead, dry leaf material is used. Pupae are brown and about ½ inch long.
A pickleworm can complete its life cycle in 30 days and there can be up to 4 generations a year.
Host plants
Pickleworms feed on both wild and cultivated cucurbit species. Creeping cucumber, Melothria pendula, is an important wild host. Cucumber, pumpkin, muskmelon, cantaloupe and squash are the common hosts of pickleworms. Among all cucurbits, summer squash is the most preferred, and the most heavily damaged.
Damage
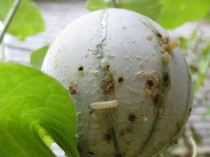
Primary concern with pickleworms is damage to the fruit. Pickleworm larvae do however, feed on, and tunnel into, flowers, vines and fruit. Young pickleworms usually feed for some time among small leaves at the growing tips of vines or within blossoms. Growing vines can get riddled with holes and cease to grow. As pickleworms grow they bore into fruit and continue to feed, causing internal damage to fruit. Entry holes are marked with a pile of white frass. Damaged fruit usually sours, spoils and rots.
Organic Control and Prevention of Pickleworms
1. Early planting: Early-planting enables growers to harvest most of the crop before the pickleworm can cause excessive losses. Very early spring plantings are seldom damaged.
2. Trap crop: Squash could be used as a trap crop to keep pickleworm from attacking other cucurbits, as squash is the preferred host of pickleworms.
3. Screen covers: The use of floating row covers has been shown to be effective against pickleworm moths and other insects from laying eggs on the plants. Row covers should be applied immediately after planting; however, they must be removed when plants begin to flower to allow for pollination.
4. Sanitation and weed control: Removal and destruction of infested plants including vines and fruit following harvest is a good cultural practice to reduce populations. Keeping the surroundings clean and weed-free can go a long way in preventing pickleworms from overwintering in and around your garden.
5. Fruit bagging: An experiment carried out in the field to test the efficacy of paper bags for protecting cucumber fruits against pickleworm penetration showed that paper bagging is 50% more effective than conventional insecticide! In addition, the color and size of the fruit were not altered by bagging.
6. Use of resistant varieties: The following varieties have demonstrated marked resistance to pickleworms: Butternut 23, Summer Crookneck, Early Prolific Straightneck and Early Yellow Summer Crookneck. Beware; the following varieties are more susceptible to pickleworms: Cozini, Zucchini, Black Zucchini Caserta, Shrot Cofozella and Benning Green Tint Scallop.
7. Monitor and handpick: Scout regularly for eggs among your cucurbits. Infested stems can be slit horizontally and the pickleworms can be removed. Soil should be placed over the injured stem to encourage rooting.
8. Natural predators: Pickleworms have natural enemies such as the soldier beetle, Calosoma beetles, Harpalus beetles, red imported fire ant, trichogramma wasps and braconid wasps that can help control or prevent infestations to an extent.
9. Spraying Bt (Bacillus thuringiensis) or Steinernema carpocapsae, a beneficial nematodes is a great solution according to a vegetable crop specialist at the University of Florida. To control an infestation, spray Bt or beneficial nematodes in the early evening on susceptible plants.
10. Neem and Spinosad: Neem products are botanical insecticides that are effective against a variety of insect pests including pickleworms through contact toxicity, disruption of insect molting and feeding deterrence. Spinosad is derived by microbial fermentation and is effective against pickleworms while being safe to most beneficial insects.
Buy Grub Control, a unique organic formulation that can be used as preventative or early treatment against young active larvae. In need of some horticultural oil for organic insect and disease protection? Neem oil may just be the what you need.
Garden peas are an ancient cultivated vegetable grown for the succulent nutritious pods. The pea (Pisum sativum) is a cool season annual crop that belongs to the Fabaceae family. Peas have a starchy, slightly sweet taste and are often served on the side of meat dishes. 
Nutritional Content of Peas
As with all legumes, peas are loaded with nutrients while being low in calories. Peas are starchy, but high in fiber, protein, vitamins, minerals and lutein. The dry weight of a pea would consist of one-quarter protein and one-quarter sugar.
Health Benefits of Peas
1. Weight management: Peas are low in fat and calories but pretty much have everything else. This ensures a high metabolism and the high fiber content can keep one satiated for long helping with weight loss.
2. Fights cancer: Green peas contain a polyphenol called coumestrol that can dramatically reduce the risk of developing stomach cancer. A study has determined that to feel this effect all you need is 2mg of coumestrol and a cup of peas has 10mg.
3. Promotes cardiovascular health: A serving of green peas provides the body with adequate vitamin K which promotes carboxylation, a process that stops calcium from depositing inside the soft tissues of the body. In addition, high vitamin K intake is associated with reduced risk of cardiovascular disease and heart attacks. The generous amount of B-vitamins helps reduce homocysteine which is a major risk factor for heart disease.
4. Lowers risk of type 2 diabetes: Studies have shown that there is a reduced risk of diabetes with the regular consumption of peas and it is due to many factors. Green peas have a low glycemic index, are a good source of protein and contain a lot of fiber, all of which contribute to this.
5. Promote healthy digestive system: Eating plenty of green peas can be great for the digestive system as the high fiber content helps move bowels regularly and prevents constipation.
6. Improves metabolism: A cup of green peas provides enough of zinc to boost metabolism, which encourages the body to burn calories at a faster rate, also contributing to weight management.
7. Nourished skin and hair: The omega-3-fatty acids in green peas help develop thicker, less brittle hair and nourish the cell membranes of the skin.
8. Maintains bone health: Green peas contain B-vitamins, calcium and vitamin K which contributes to healthy bones and makes one less likely to develop osteoporosis.
9. Blood sugar regulation: High fiber and protein content slow down the absorption of sugar from the intestine into the blood helping to maintain blood sugar levels.
10. Reduces bad cholesterol: Peas contain niacin which helps reduce the production of triglycerides and LDL cholesterol which in turn increases the amount of good cholesterol in the body.
Read How to Grow Peas for detailed instruction and tips. Find Heirloom Peas Seeds at our online store.
Mealybugs are insects in the family Pseudococcidae, unarmored scale insects found in moist, warm climates. They are considered pests as they feed on plant juices of greenhouse plants, house plants and subtropical trees and also act as a vector for several plant diseases. There are approximately 275 species of mealybugs known to occur throughout the United States.
Description
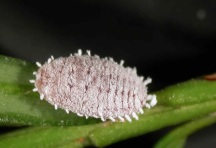
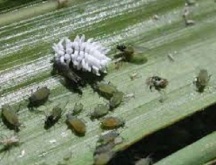
Mealybugs are very small (about an eighth of an inch long), oval-shaped flightless bugs that have a white powdery appearance and infest both indoor and outdoor plants. They move slowly, when they move at all. Mealybugs are soft-bodied insects, but they secrete a powdery wax layer over themselves. This protective layer gives them their name, as it makes them look as though they’ve been coated in meal or flour. It is also what makes them quite hard to kill.
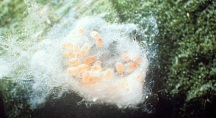
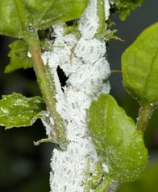
Mealybug infestations appear on plants as fuzzy, white cottony-looking mass around the stems and leaf nodes. Female mealybugs hide their eggs in this fluffy white excretion and can deposit 300-600 eggs within their compact, cottony mass.
Eggs hatch in 1-3 weeks and small active yellow nymphs move all over the plant in search of feeding sites in which to settle in. As they feed, they secrete honeydew and a waxy coating begins to form over their bodies. Nymphs spend 4-8 weeks developing into the adult form.
Plants they attack
Mealybugs thrive on a wide variety of indoor and outdoor species, including ficus, philodendron, coleus, begonia, citrus plants, fern, dracaena, ivy, poinsettia, cacti and succulents, African violets, bougainvillea, fuchsia, grape vines, hoya, orchids, oleander, passion flower, peach, tomato, potato, pineapple, coffee trees, cassava, papaya, mulberry, sunflower and avocados among others.
Damage and Symptoms
Mealybugs feed on plant sap and generally position themselves under leaves and at stem joints, while they attack the plant with their piercing mouths known as stylets. This penetrative feeding damages the plant by draining its sap and may possibly transmit bacterial and fungal infections. This sap feeding weakens the plant and causes slow plant growth, yellowing and deformed leaves and leaf drop. They also excrete large amounts of sticky ‘honeydew’ that attracts ants and may lead to the growth of sooty mold. Damage is not often significant at low pest levels; however, heavy infestations can kill a plant.
Organic Control and Prevention of Mealybugs
1. The first rule of successfully ridding plants of mealybugs (or any pest for that matter) is to detect and act upon them early. It’s far easier to rid of a small infestation than to eradicate a full-blown attack. Inspect your plants regularly to ensure early detection.
2. The water cure: Isolate the infected plants. Spray as strong a stream of water as the plant can bear. This will dislodge most of the bugs. Kill dislodged bugs, if not already dead. For this to be effective, repeat on a daily basis until the mealybugs are gone.
3. Sanitation and cultural control: It is a good practice to keep your garden and greenhouse clean and void of old and unwanted material. Dead leaves and prunings should be removed as these may have mealybugs or their eggs on them. Do not overwater or over-fertilize as mealybugs are attracted to plants with high nitrogen levels and soft growth.
4. Control ants: Ants feed on the honeydew that mealybugs produce and act as their henchmen by protecting them from predators to ensure their food supply.
5. Organic insecticidal soap: Buy an organic insecticidal soap which utilizes the power of potassium salts of fatty acids that works by weakening the insect’s waxy protective outer shell and spray on infestations. These soaps are generally safe to use on vegetables but always check the label.
6. Rubbing alcohol method: Spot treat mealybug infestations with a cotton ball dipped in rubbing alcohol. Simply dab the critters and rub them away. The alcohol strips away the waxy coating leaving the mealybugs exposed.
7. Organic dishwashing liquid: Any soap will effectively suffocate the mealybugs as the soap coats the bug and also breaks down their protective waxy layer. Just mix the dishwashing soap in water and spray on infestations.
8. Neem oil: Neem oil derived from the neem tree has insecticidal properties in addition to being a fungicide and having systemic benefits.
9. Kitchen insect spray: Combine 1 garlic bulb, 1 small onion and 1 teaspoon of cayenne pepper in a blender. Mix into 1 quart of water and allow it to infuse for an hour. Strain through a cheesecloth and add a tablespoon of organic soap and mix well and spray!
10. Beneficial insects: Beneficial insects and parasites are considered the best long-term solution for mealybug infestations. Ladybirds, lacewings and hover flies kill mealybugs. Parasitic wasps (Leptomastix dactylopii) parasitize mealybug eggs and are an effective method of controlling infestations. There is also a commercially available mealybug predator known as the ‘mealybug destroyer’, which is a small dark brown ladybug (Cryptolaemus montrouzieri) whose preferred food happen to be all the stages of mealybugs.
The onion (Allium cepa), also known as the bulb onion or common onion, is used as a vegetable and is now the second most important horticultural crop after tomatoes. Onions belong to the lily family, the same family as garlic, leeks, chives, scallions and shallots. Onions are often called the “king of vegetables” because of its pungent taste. Also, onions when cut make the eyes water, because of cysteine sulfoxides that are released.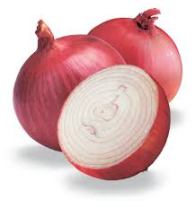
Nutritional Content of Onions
Onions are a very rich source of vitamin C, vitamin B6, biotin, chromium, calcium, sulfur and dietary fiber. They also contain good amounts of folic acid, vitamin B1, potassium, selenium, phosphorus and vitamin K.
Health Benefits of Onions
1. Excellent oral health: Onions are often used in the prevention of tooth decay and oral infections. Chewing raw onions for 2-3 minutes has the potential to rid of germs in the mouth, including the throat, gums and lips.
2. Anti-septic properties: Onions have been used to fight bacteria, including E.coli and salmonella, and are also effective against tuberculosis and infections of the urinary tract, such as cystitis.
3. Reducing cholesterol: Consuming half a medium raw onion a day helps to correct thrombosis, lowers LDL (bad) cholesterol and prevents heart attacks. In addition, onions boost the beneficial HDL cholesterol.
4. Relieves stomach aches: Onions have anti-inflammatory and anti-bacterial properties that can give relief to upset stomachs and other gastro-intestinal problems. This is owed to the saponins contained in onions which are anti-spasmodic chemicals that ensure that stomach disturbances do not continue and that the bowels are clear and smooth functioning.
5. Treatment of anemia: Onions with jaggery and water can improve anemic conditions as they add significant amounts of minerals, iron in particular, which help the body in producing new red blood cells.
6. Anti-inflammatory properties: The many anti-inflammatory agents in onions help reduce conditions such as arthritis and gout.
7. Maintains healthy blood pressure: Onions help to lower blood pressure naturally by thinning the blood, dissolving blood clots and ridding the blood of unhealthy fats.
8. Maintains blood sugar levels: Onions are great for diabetics as they bring down insulin levels and improve glucose intolerance.
9. Promotes digestive health: The fiber content of onions coupled with the various components of onions helps maintain a healthy digestive system, relieving chronic constipation and flatulence.
10. Fight cancer: Onions are rich in active compounds that have been shown to successfully inhibit the development and spread of cancerous cells, quercitin being one of those compounds.
11. Boosts immune system: Onions contain numerous phytochemicals along with vitamin C that boosts the immune system, helping it rid and fight off foreign bodies and toxins.
12. Prevent osteoporosis: Recently, a compound contained in onions has been identified to help in the prevention of osteoporosis by preventing the breaking down of bones.
13. Fights common ailments: Onion helps liquefy mucus and prevents its further formation and is also excellent against cold and coughs and other respiratory problems.
14. Boosts sexual drive: Onions have long been known to be a potent aphrodisiac and are second only to garlic.
15. Treating urinary disorders: Onions can help rid of the burning sensation that is experienced during urination. Water with onion is to be boiled till half the water is evaporated, water is separated and cooled and drunk. The anti-bacterial properties of onion help removing urinary tract infections and diseases.
Read How to Grow Onions for detailed instruction and tips. Find various Heirloom Onion Seeds at our online store.
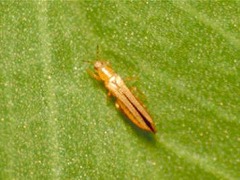
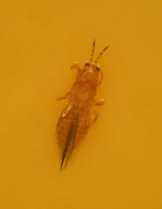
Thrips are tiny, slender insects with fringed wings that feed on a large variety of plants, by puncturing and sucking up the contents. Common names for thrips include thunderflies, thunderbugs, storm flies, thunderblights, storm bugs and corn lice. There are many different species of thrips (over 5,000), most of which are pests (often in the family Thripidae), while certain species (black hunter thrips and sixspotted thrips) are beneficial predators that feed only on mites and other insects.
Thrips are extremely active, feed in large groups and leap or fly away when disturbed.
Lifecycle and Description
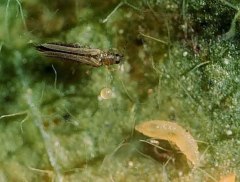
Adults are minute, slender insects with narrow fringed wings and measure about 0.5 mm to 1 mm long. Immatures (called larvae or nymphs) are similarly shaped with a long, narrow abdomen but lack wings. Thrips are not strong fliers but can readily travel long distances by floating with the wind or being transported on infested plants. Most thrips range in color from translucent white or yellowish to dark brown or blackish, depending on the species and life stage.
Adults and pupae overwinter in garden soil, sod, debris and cracks in barks. In spring, emerging females lay eggs in plant tissues including flowers, stems and leaves. Eggs hatch in 3-5 days in warm weather, or in weeks in colder weather. Nymphs feed for 1 to 3 weeks, then depending on the species either drops down to the soil to pupate or pupates on the plant itself. Pupal stage lasts 1 to 2 weeks before adults emerge. There can be 5 to 15 generations a year outdoors and year-round generations in greenhouses.
Host plants
Thrips have been found on various plant orders showing their wide host plant range including various berries, field crops, forage crops, grass flowers, legumes, peonies, privet hedges, roses, trees, truck crops, vines and weeds. They are known to cause damage to avocado, beans, citrus and blueberry plants, figs, azalea, hypericum, photinia, rhododendron, garlic, onion, pepper, carrot, squash, gladioli, toyon, impatiens, petunia, cucurbits, grapes, strawberry, stone fruit among others. They seem to prefer grasses and yellow or light-colored blossoms.
Damage
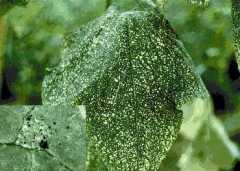
Thrips, both adults and nymphs cause damage to the plant by piercing and sucking out cells on the leaf surface, leaving a silvery stippling or streaking on leaves. Severe thrip infestations can stunt and distort plants, damage flowers and scar fruit. Some species are responsible for spreading tomato spotted wilt virus (TSWV) and impatiens necrotic spot virus (INSV).
Organic Control and Prevention of Thrips
Producing thrips-free crops requires a multi-faceted approach, as with many other pests.
1. Eliminate sources: Remove weeds and grass from in and around your garden areas to eliminate alternate hosts for thrips. Remove and dispose of old, spent flowers after your harvest. Proper disposal of plant residues is also important.
2. Start and stay clean: An important part of keeping your crops void of thrips is to make sure the young plants are clean. Examine purchased plants or transplants for thrips before placing them in your greenhouse or garden. Covering openings to greenhouses has found to reduce pest problems by up to 70%. Vigorous healthy plants normally outgrow thrips damage, but excessive use of nitrogen fertilizers may promote higher populations of thrips.
3. Monitor: The most reliable way to detect thrips is with a yellow or blue sticky trap. Branch beating or shaking foliage or flowers onto a sheet of paper or a beating tray or sheet can help monitor and rid of a few thrips. Hosing down thrips from infested plants does help reduce pest numbers to a certain extent.
4. Row covers: Row covers, hot caps, and other types of cages can exclude thrips and other pests from vegetables and other young herbaceous plants. Basically, any type of covering that excludes insects but allows light and air penetration can be used.
5. Reflective mulch: Reflective mulch is said to confuse and repel flying insects that are searching for plants because the reflected ultraviolet light interferes with the insect’s ability to locate plants. This is more effective during early growth when plants are small and do not cover the mulch. Reflective mulch has been shown to delay or sometimes even prevent pests such as winged aphids, thrips, leafhoppers and whiteflies.
6. Pruning: Prune and destroy injured and thrips infested terminals of plants. Shearing is not recommended though as it stimulates new susceptible growth. Instead, prune by cutting plants just above branch crotches and nodes.
7. Beneficial insects: Release commercially available natural predators to prey on thrips such as minute pirate bugs, damsel bugs, ladybugs, lacewings, predatory mites (Amblyseius cucumeris) and parasitic wasps or attract them to your garden by planting alfalfa, goldenrod and yarrow.
8. Biological insecticides: Biological insecticides such as Beauvaria bassiana and Verticillium lecanii are an effective strategy against thrips. Both are fungi that grow naturally in soils and are proven to help rid of thrips and many other pests. Spinosad insecticide is based on a compound found in a bacterial species and it helps kill thrips among several others.
9. Soaps and oils: Spray a safe organic insecticidal soap or horticultural oil such as neem oil on afflicted plants to aid with thrips control.
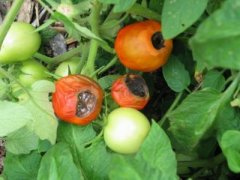
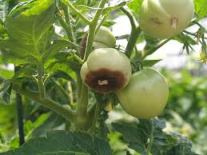
Blossom-end rot is a common physiological problem associated with growing conditions that can affect susceptible plants anywhere. It affects fruit. Stems and leaves show no symptoms.
Causes
Blossom-end rot is a non-infectious disease or disorder of fruits caused by low levels of calcium in the fruit. For example, a tomato’s fruit needs calcium to grow. Calcium acts like glue, binding cells together. Tomatoes absorb calcium through water but calcium isn’t fast moving. If a tomato grows rapidly, or if some other conditions slow water absorption, then calcium doesn’t circulate evenly throughout the fruit. The tomato’s tissues breakdown and leave the telltale damage of blossom-end rot on its bottom end.
Several factors can limit a plant’s ability to absorb enough calcium for proper development. These include:
- fluctuations in soil moisture (too wet or too dry)
- excess nitrogen in the soil (lowers calcium uptake)
- root damage
- cold temperatures/cold soil
- soil pH that’s markedly acidic or alkaline
- excessive heat
- soil high in salts (lowers the availability of calcium)
Plants Commonly Affected
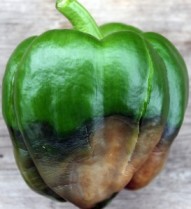
Tomato, pepper, cucumber, squash, eggplant, watermelon and other fruiting vegetables.
Damage and Symptoms
Blossom-end rot occurs on both green and ripe fruits and is characterized by a water-soaked, sunken, or brown spot on the blossom end of the fruit when the fruits are approximately half their full size. The spot then enlarges and turns into a leathery brown or black patch. If the problem is severe, the fruit will have a flattened or somewhat concave bottom end. Blossom-end rot will not spread from plant to plant or from fruit to fruit. The plant will generally show no signs of damage, yet the fruit will show tell-tale signs of blossom-end rot.
Organic Control and Prevention of Blossom-End Rot
Prevention:
- Protect young seedlings from extreme temperatures and conditions by gradually hardening them off.
- Grow plants in soil with good drainage.
- Plant outside at the right time when soil is warm enough. Avoid setting plants out too early in the season, which can expose them to cold soil and temperatures.
- Soil worked with organic matter and compost will allow the plant’s root system to grow strong and deep.
- Avoid excessive nitrogen fertilization. Ensure adequate phosphorous levels.
- Test your soil pH; tomatoes grow best at a soil pH of about 6.5. If needed, add quick-release lime to provide plenty of absorbable calcium.
- Supply water evenly throughout the season to facilitate regular uptake of calcium. Tomatoes need 1-3 inches of water a week. They are known to prefer deep watering a couple of times a week rather than everyday superficial watering.
- Avoid close, deep cultivation after fruit set, especially in dry weather. Scraping the soil lightly with a hoe is usually sufficient to control weeds in home gardens.
- Mulch established plants to conserve moisture and provide a more uniform water supply. Suitable materials are straw free of weed seeds, corncobs, grass clippings, peat moss and newspaper.
- Cultivate carefully around plants to avoid damaging root systems.
- Choose resistant vegetable varieties whenever possible.
Control:
Blossom-end rot cannot be reversed on fruits once it’s set in, but steps can be taken to slow and halt it.
- At the first sign of blossom-end rot, pay attention to watering and mulching. Even out water supply to the plant so that it is never super dry and then super wet, instead make sure it has a steady, even supply of water.
- Preserve affected plants by applying calcium immediately. Spray plants with natural calcium solutions such as Enz-Rot and Rot-Stop, which are specifically meant to treat blossom-end rot by correcting calcium deficiency. Follow label directions for application. Or mix 1 tablespoon calcium chloride in 1 gallon of water. Apply in the morning when temperatures are cool.
- Reduce stress on the plant by picking affected fruit and thus allowing it to direct its energy to other tomatoes.
- Cut out rotted spots on harvested fruit as blossom-end rot does not make the rest of the tomato inedible. However, if tomatoes have been infected by fungi or mold, discard them.
- Spray with seaweed extract help supply some calcium to affected plants.
Most plants usually grow out of the problem later in the season when growing conditions have been corrected. Determinate varieties are more prone to blossom-end rot because they set fruit in a short period of time, whereas indeterminate and semi-determinate varieties set fruit throughout the season, allowing for easier calcium regulation for plants.
Okra (Abelmoschus esculentus), also known as lady’s finger, bhindi or gumbo is a highly nutritious vegetable, usually eaten while the pod is green, tender and immature and is a perennial flowering plant that belongs to the mallow family. The appearance of okra is comparable to that of a grooved pepper and food experts believe that okra originated in Africa. History says that Cleopatra of Egypt loved to eat okra and that okra’s popularity has seen that it never disappears from local markets or convenience stores throughout the world, throughout the year. 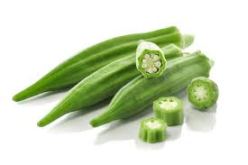
Nutritional Content of Okra
Okra is a popular health food that is high in fiber, vitamin C and folate. Okra is also a source of many antioxidants and nutrients including calcium, potassium, thiamin, riboflavin, iron, vitamin A and magnesium. It also contains starch and some fat which is mainly unsaturated.
Health Benefits of Okra
1. Okra’s fiber is superior and helps stabilize blood sugar by curbing the rate of absorption of sugar thus making it an anti-diabetic.
2. Okra fiber is excellent for feeding the good bacteria in the gut and contributes to the health of the intestinal tract.
3. The rich fiber and mucilaginous content in okra pods helps in smooth peristalsis of digested food particles and can help relieve constipation.
4. Fresh pods are a good source of folates whose consumption is especially good during pregnancy because it prevents babies being born with birth defects.
5. Okra helps in the treatment of lung inflammation, sore throat and irritable bowel syndrome.
6. Okra contains vitamin K which is necessary in the blood clotting process and plays a vital role in the strengthening of bones in the body.
7. The soluble fibers in okra, called pectin, helps lower blood cholesterol levels by 10%.
8. Asthma can be treated by including okra in one’s meals.
9. Okra is good for the skin and protects the skin from pimples while maintaining smooth and beautiful skin.
10. Regular consumption of raw or cooked okra can help avoid obesity.
11. Okra can help lower the risk of cataracts and is believed to protect against some forms of cancer expansion, especially colorectal cancer. This is due to the high amounts of vitamin A and flavonoid antioxidants such as beta carotenes, xanthin and lutein.
12. Okra can prevent sun strokes.
13. Okra pods are an excellent source of vitamin C which helps the body’s immunity system in the fight against infectious agents, cold, flu and harmful free radicals.
14. Okra is great in protecting against atherosclerosis owing to its action of supporting the structure of capillaries.
Read How to Grow Okra for detailed instructions. Find organic heirloom Okra seeds and much more at our online store.

