You are currently browsing the category archive for the ‘Gardening Tips’ category.
What is the difference?
What are the best practices for you and your yard or garden? Below, organic gardening, sustainable agriculture and permaculture are discussed. They are similar to each other yet have key differences and are applicable in different scenarios. Mix and match the best of them to best suit your purposes.
Organic gardening
Organic gardening is a form of agriculture that relies on techniques such as crop rotation, green manure, compost, and biological pest control.
Simply put organic gardening is growing food without the use of chemical pesticides, herbicides and inorganic fertilizers. It relies on the use of beneficial insects, diversity of plants, and the use of compost to supply the soil with nutrients. Organic gardeners don’t use synthetic fertilizers or pesticides on their plants.
An organic gardener looks at plants as part of the whole system within nature that starts in the soil and includes the water supply, people, wildlife and even insects. An organic gardener strives to work in harmony with natural systems and to minimize and continually replenish any resources the garden consumes.
Sustainable agriculture
Sustainable agriculture has been defined as an integrated system of plant and animal production practices having a site-specific application that will last over the long term. In simplest terms, sustainable agriculture is the production of food, fiber, or other plant or animal products using farming techniques that protect and conserve the environment, public health, human communities, and animal welfare. This form of agriculture enables healthy food to be produced without compromising the future generations’ ability to do the same.
A sustainable garden works in harmony with nature. There are many techniques that can improve the health of your garden and minimize any negative impact on the environment. Most are easy and will save you time in the long run.
Sustainable gardening includes: organic gardening, double digging, worm composting, backyard composting, integrated pest management, and more.
It is to cultivate in a way such that there are enough resources to live well and survive in a varied and flourishing environment for a long time. It involves using renewable resources properly.
Permaculture
Permaculture, originally ‘Permanent Agriculture’, is often viewed as a set of gardening techniques, but it has in fact developed into a whole design philosophy and for some people a philosophy for life. It is more inclusive of everything, and is an entire way of living, not just gardening or growing things.
Permaculture teaches us how to build natural, energy-efficient homes, build waste water treatment systems, use recycling techniques, grow our own food, raise our own animals (chickens, cows, pigs, bees, etc.), restore diminished landscapes and ecosystems, catch rainwater, build communities, and much more. Its principles are constantly being developed and refined by people throughout the world in very different climates and cultural circumstances.
Combining the best of natural landscaping and edible landscaping, permaculture aims for a site that sustains itself and the gardener. The purpose of permaculture could be to ultimately develop a site until it meets all the needs of its inhabitants, including food, shelter, fuel and entertainment. Permaculture emphasizes the use of native plants or those that are well adapted to the local area.
Do What Works Best For You
As a gardener you will find your own way as you garden more, and try different and varied techniques. What works best for you may not work for someone else, so look around for ideas, try them, keep what works and toss out what doesn’t.
The best thing is to try new techniques and have fun doing it!
Putting It All Together
Here are five basic ideas to get you thinking:
1. Compost Your Lawn: Instead of reaching for the chemical fertilizers to feed your lawn, compost your lawn instead. It works better, is longer lasting, and it is fast and easy to do. Choosing to use fewer chemical-based products is always the better option.
2. Use Neem and Other Organic Sprays: Companies like Bayer and Ortho have brainwashed a lot people into thinking you need to bomb disease and pests with heavy duty chemicals to rid your houseplants or garden of your problems. Actually there is a nice balance that can be reached, and using more natural based sprays like neem oil, baking powder solutions and homemade organic sprays can go a long way. They may not always entirely rid your plant of the problem, but most plants, if given optimal growing conditions and nutrients, can still grow and be productive as long as the disease or pests are kept at bay.
3. Double-Digging: This means to dig out the first 12 inches (30 cm) of topsoil, take a portion of it for your compost pile, then dig down another 12 inches (30 cm). This aerates 24 inches (61 cm) of your soil, improving its texture and ability to absorb and drain water and nutrients.
4. Worm Composting: A plastic bin with holes can house a family of red wiggler worms, who will eat your kitchen waste (eliminating it from the city waste stream), and they will make it into good, odor-free compost.
5. Backyard Composting: Using a myriad of techniques, you can compost your yard waste, kitchen waste, and create nutrient rich organic matter to add back into your garden soil.
Grow amazing juicy tomatoes every year
If you want to consistently grow juicy, full-flavored tomatoes every year, try these growing tips used by top tomato growers:
1. Choose a bright spot with good air circulation.
Plant your tomatoes in a spot that will receive at least 10 hours of light during the summer. Ensure that there is room between plants for air to circulate.
2. Practice crop rotation.
Alternating your tomato beds between even just two spots will diminish the chance of soil borne diseases such as early blight and bacterial spot.
3. Plant tomatoes deep.
Plant your tomato seedlings up to the first true leaves. New roots will quickly sprout on the stems. This makes your tomato plants establish a much larger root ball and gives you a higher yield.
4. Keep plants warm.
Temperatures cooler than 50 deg. F (13 deg. C) slow tomato plant growth and prevent fruit from setting. Protect them with heavyweight row covers or cloches to shield them from chilly nights until the nights are naturally warm enough.
5. Feed the soil appropriately.
A common mistake one should avoid is over-feeding the soil. Tomatoes thrive in soil that is rich in humus for extensive, well-developed root systems and potassium for strong stems. Adding too much nitrogen will produce overly lush plants with little fruit.
Homemade compost will typically supply all the necessary phosphorus the tomatoes need for good flowering and fruiting. A weekly spraying of liquid kelp or seaweed extract will increase the health and yield of your tomato plants.
6. Grow them up.
Tomato vines that are left to sprawl over the soil are more prone to attacks by pests and diseases than ones that have been staked or caged.
7. Choose indeterminate varieties.
Indeterminate tomato varieties tend to produce more fruit but require more space to grow, so make sure everything is in place and that you have enough room.
8. Water deeply but infrequently.
Tomato plants that are established in the soil have their roots spread deep inside the soil and as a result require deep watering less frequent than those growing in containers. Soak your tomato bed once a week, or every five days at the height of summer. Water evenly and consistently and water directly on the soil and not on the leaves to help avoid blossom end rot, fruit splitting and other tomato problems brought on by uneven watering.
9. Pluck, prune and trim.
Many tomato growers pull off the first flowers, so that the plant does not devote energy to forming fruit before its roots and foliage have filled out. Pinch off the sucker (non-fruiting branches) too to direct the plant’s energy into growing bigger, better fruit.
As your tomato plants grow, remove the bottom leaves as these are the oldest leaves and are usually the first to develop fungal problems. Go easy on pruning the rest of the plants though, as it’s the leaves that are photosynthesizing and creating the sugars that give flavor to your tomatoes.
10. Mulch.
Many organic gardeners rely on plastic mulch to warm up the soil in the start of spring and prevent weeds from sprouting up. Study after study has shown that beds covered in black plastic in spring produce tomatoes earlier and in abundance all season long. Infra-red transmitting plastic mulch is very effective researchers have found, as it reflects just the kind of light that plants need.
All natural mulches also help tomatoes grow. Surround your plants with a layer of straw, leaves, dried grass clippings or pine needles to prevent weeds from growing and retain moisture in the soil. Natural mulches keep the soil cool, so don’t apply them until the soil warms to a minimum of 65 deg. F (18 deg. C).
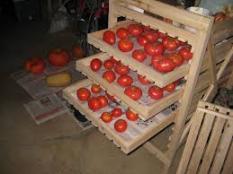
Nothing beats the taste of freshly picked ripened homegrown tomatoes which are, without a doubt, superior to store-bought produce. However, as the end of the season nears and temperatures start to decline there are invariably plenty of green tomatoes left on plants that didn’t quite make the cut.
What to do with all of those unripe tomatoes that were left on the plant, you must be pondering! These, too, will ripen over the next few months if stored properly. They won’t be as tasty or juicy as the ones you’ve been enjoying all season long, but they will be real tomatoes from your own garden, and still way better than anything you can buy in a supermarket from November through May.
What makes tomatoes ripen?
Contrary to popular belief, windowsills aren’t the best place for ripening tomatoes. If you’ve noticed, your tomatoes often start to ripen on the side opposite to the side exposed to sunlight although not all varieties show this nature. So, a good amount of light is not required for ripening, furthermore it is known to harden the fruits’ skin.
On the other hand, temperature is an important factor. The warmer the temperature the quicker a tomato fruit will ripen. Hence, ripening can be slowed down by placing tomatoes in a cool area or sped up by placing in moderate warmth.
Another factor that is crucial in the ripening of tomatoes is ethylene gas. Ethylene is actually naturally released by ripening fruits such as bananas, apples and tomatoes. So, placing a ripe banana or apple among green tomatoes helps speed up the ripening process.
Different methods
Here are several techniques you can employ to ripen tomatoes:
1. Jar method: Place a ripening banana along with your green tomatoes in a glass, ceramic or plastic jar. Do not overfill the jar, or the tomatoes might get bruised. Screw the lid tightly and leave it in a warm, semi-humid environment, out of direct sunlight.
2. Cardboard box method: Line a cardboard box with newspaper and place the green tomatoes on top in a single layer with a little space in between. Placing ripening bananas along is optional. Cover with another layer of newspaper and place the box out of direct sunlight, in a warm and low humid environment such as a basement, insulated garage, or enclosed porch.
3. Paper or plastic bag method: Put 5-10 green tomatoes in a paper or plastic bag with a ripening tomato, banana or apple and place in a warm, low-humid place. Punch in a few air circulation holes in each plastic bag being used. Paper bags are naturally semi-permeable (meaning they allow to an extent air to diffuse through them).
4. Hang the whole plant method: This method is useful at the end of the season when a frost is forecast as frost is damaging to tomatoes making them turn dark green and unable to ripen. Gently pull up the whole tomato plant and hang it upside down in a garage or cellar where temperatures remain above freezing. This method supposedly gives better tasting tomatoes than the other methods.
Tomatoes ripen from the bottom up and the inside out, so don’t put tomatoes on a windowsill to ripen because they will only turn red, but not ripe. They will remain green inside.
The best results are got when the tomatoes are already showing a yellow-orange tinge which indicates that they are ready to ripen. You can be successful with turning fully green tomatoes into ripe ones but they will take longer and may not be so flavorsome.
It takes about 3-4 weeks for ripening at lower temperatures 10-15 deg. C (50-60 deg. F) whereas it can take just 2 weeks at 18-21 deg. C (65-70 deg. F).
Watch out for:
Diseased or damaged fruit is the biggest problem when ripening tomatoes indoors. Avoid piling them up to prevent and protect them from being bruised or squashed. Ensuring adequate air circulation will prevent molds from forming.
Every day or two check up on them and remove anything suspect. Select only the very best tomatoes for ripening as any lower grade tomatoes may be suffering from a disease such as blight.
Intercropping and its Advantages
Intercropping, also known as interplanting is a great way to get more from the space in your garden without having to actually expand your current garden. Intercropping is defined as the growth of two or more crops in proximity in the same field during a growing season to promote interaction between them.
The most common goal of intercropping is to produce a greater yield on a given piece of land by making use of resources that would otherwise not be used by a sole crop. Intercropping uses the plant’s natural growth pattern to match crops together and maximize space in the garden. Hence careful planning is required, taking into account the soil, climate, crops, and varieties. It is particularly important not to have crops competing with each other for physical space, nutrients, water or sunlight; otherwise the main purpose of intercropping will have been lost!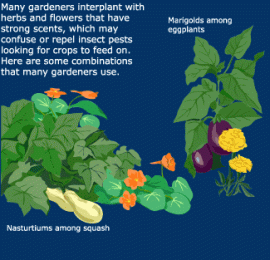
Intercropping allows for intercrops to more completely absorb available growth resources, such as light, water and nutrients and convert them into plant matter as a result of their difference in competitive ability for growth. This more efficient utilization of resources leads to yield advantages and increased stability compared to sole cropping.
Furthermore, the multifunctional profile of intercropping allows for other positive roles such as resilience to disturbances, increased protection of individual plant species from their host-specific pests and diseases, encourage biodiversity by providing a habitat for a variety of insects and soil organisms, reduce erosion and protects top soil, attract more beneficial insects, minimize development of weeds, improved product quality and reduced negative impact of arable crops on the environment.
Factors of Intercropping
When two or more crops are grown together, each must have adequate space to maximize cooperation and minimize competition between the crops. Several factors are to be considered for successful intercropping, such as,
-Spatial arrangement, plant density, maturity dates of crops and plant architecture.
-Crops planted together should approximately need the same amount of sunlight and water and have similar soil preference.
-Plants have different root growth patterns; shallow rooted, medium rooted and deep rooted. The idea is to interplant crops so that they won’t compete directly with each other. E.g.: Corn, broccoli, spinach, cabbage and lettuce are all shallow-rooted crops. Cucumbers, turnips, beans, summer squash, carrots and peas are medium-rooted. Tomatoes, asparagus, winter squash (including pumpkin) and parsnips are deep-rooted.
-Crops belonging to the same family are not meant to be intercropped as they make for easy targets for pests. Tomatoes, eggplants, peppers and potatoes should not be paired. Also, crops with common pests should not be planted together. Hence, tomatoes and corn which are attacked by tomato fruitworm/ corn earworm should not be planted together. Squash, cucumbers, pumpkins and melons share the same enemy, the pickleworm, thus should not be planted close by.
Types of Intercropping Practices
There are a number of ways for people to utilize the benefits of intercropping.
-Mixed intercropping, is the most basic form in which crops are totally mixed in the available space.
-Row intercropping is the cultivation of two or more crops simultaneously on the same field with a row arrangement.
-Strip intercropping is growing two or more crops together in strips wide enough to permit separate crop production using machines but close enough for the crops to interact.
-Relay intercropping involves planting a second crop into a standing crop at a time when the standing crop is at its reproductive stage but before harvesting, to make room for the full development of the second.
Intercropping Examples
Examples of intercropping strategies are planting a deep-rooted crop with a shallow-rooted crop, planting a light nutrient feeder with a heavy feeder, planting a tall crop with a shorter crop that requires partial shade, or planting a fast-maturing crop with a slow-maturing crop.
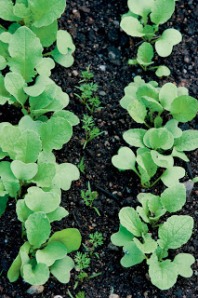
Radish and Carrots: Plant radishes with carrot seed. The radishes germinate and are harvested first, leaving space for the slow-maturing carrots.
Spinach and Tomatoes: Plant spinach in between tomato plants and they will mature before the tomato plants get large enough to shade it.
Onions and Cabbage: Onions will grow faster than cabbage and can be grown in between cabbage plants. As the cabbage grows larger they shade the onion bulbs, keeping the soil cool and moist. The leaves may also deter onion maggots from finding the onion crop.
Other Combinations:
Lettuce and broccoli, mesclun and tomato, Brussels sprouts with radishes or beets, corn and beans, tomato and lettuce, carrot with beet, lettuce and kale, radish and artichokes or squash, tomato and basil, arugula with tomato, pole beans or trellised cucumbers, bush beans between tomatoes, peppers or eggplant, leeks and cilantro, winter squash with corn, corn and lettuce.
What is Vertical Gardening?
Think your garden space is not quite enough for your needs? Have only a limited sunlit area? Plagued with a sore back from too much bending over to weed? Got bare walls that are begging to be used? Well then, vertical gardening is the way to go! Make the most of your garden space with delicious vegetables and fruits up on trellises and arbors, colorful flowers in towers of pots and hanging baskets, while enjoying the benefits of easy maintenance, healthy plants, effortless harvesting and high yields.
Vertical gardening is any technique that utilizes various resources to allow plants to extend upward rather than along the surface of the garden. Vertical gardening can be more than just letting ivy crawl over a fence or hanging flower pots from the eaves- it brings this whole new dimension to your landscape that was being unused before!
No surprises here, but vertical gardening is just what it sounds like- making plants grow upwards using a wall or trellis or any sort of support- rather than growing out and to the sides as in a typical garden. It is one of the hot gardening trends these days especially since it is applicable in small spaces, patios, porches, balconies, window sills, you name it! Heck, it even makes dull walls and fences spectacular. Through vertical gardening, you also obstruct undesirable views or create an area of architectural or aesthetic interest.
Benefits of Vertical Gardening
-Plants growing upwards have a smaller footprint than those out in beds, i.e. saves space.
– Lesser work and time in preparing vertical gardens- no tilling, no digging.
– Lesser bending and backbreaking work.
– Better protection from soil-borne diseases and pests.
– More plant varieties in smaller spaces.
– Overall lesser maintenance chores.
How to Grow Vegetables Vertically
In recent years, we’ve been shown undisputable proof that fresh, homegrown organic produce is tastier, healthier and cheaper than purchasing from a store. When you think of growing vegetables you think “out”, but here we are letting your mind wander “up”!
1.Plan the vertical garden
Like any garden, to start off you need to plan. Determine the location of your vertical garden depending on what plants you plan to grow. Most vegetables require at least 6 hours of the sun. Understanding the basics of growing vegetables vertical is mandatory. Almost any vegetable can be grown vertically given an adequately deep container and a vertical support that is strong enough to hold the plant with its fruit.
Evaluate the conditions of your garden to choose vegetables that will thrive based on sunlight, wind, humidity and heat. Prepare to water vertical vegetables daily. Select “vine” varieties of plants when applicable.
2. Prepare the soil:
Ah, soil. You’d want weed-free, compost-rich organic soil for your vertical garden. The soil you use would of course depend on the requirement of the plant growing but in general, a mixture of fertile top soil and peat moss or perlite should work wonders.
3. Structures and containers:
Gardeners growing vertically do so using some sort of vertical support structure or container. Trellises, pyramids, tripods, arches, arbors, fences, wire cages and frames, gazebos and walls are all commonly used structures. Even consider options such as bamboo poles, tree branches, ladders and plants with strong stems.
Choosing the type of support structure would depend on the plant you’re planning to grow. For example, tomatoes would need sturdy vertical support structures, while peas would just climb over any structure without bearing much weight on it.
Always place the support structure in your garden before planting the vegetables to prevent damaging your plants. Yes, more proof that planning is essential.
Several containers are available for vertical gardening, including hanging baskets or hay baskets, pot hangers, cascaded pots (pots mounted on each other), window boxes, urns, clay pots and even wooden crates. The main requirement is that the container being used is deep and sturdy enough to support the type of vegetable you are growing. Drainage is important too, so if the container does not have holes, drill a few on the bottom of the container before filling it up with soil.
Vegetables To Grow Vertically
– Pole Beans: Pole beans will climb almost any structure, including other plants. Native Americans grew pole beans alongside corn because the corn stalks provide the vertical support.
– Peas: Like pole beans, peas will also climb any structure with ease and barely need encouragement to twine around vertical supports. Trellises, bamboo sticks, arches and arbors can be considered while growing peas.
– Tomatoes: Tomatoes are heavy plants that require sturdy vertical supports. As the tomato plant grows, fasten the branches to the structure with a soft twine or cloth regularly. Select non-bush or indeterminate tomato types.
– Winter Squash and Gourds: These have long vines that necessarily need sturdy structures to support their weight. Trellises work well for winter squashes and gourds. To provide extra support to growing fruit, wrap cloth or strips of pantyhose around the fruit and secure it to the vertical support.
– Cucumbers: The vine variety of cucumbers is ideal for a vertical garden as they are natural climbers. A-frames, cages or trellises are strong enough to support cucumber vines. In the beginning they may need a little encouragement to entwine themselves around the vertical structure, but as soon as the tendrils attach themselves there is no stopping them.
– Melons and Pumpkins: Melons and pumpkins too have long vines and their fruit will need the additional support of wrapped cloth tied to the vertical support. Vertical support can be provided in the form of any sturdy trellis or cage.
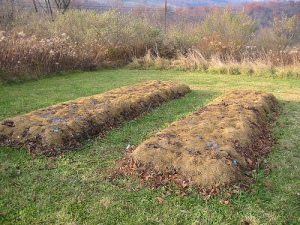
An easy method to garden without having to break your back digging up or tilling the soil in your garden is the Lasagna gardening method. Also known as layered gardening, sheet composting, sheet mulching, no-dig gardening, the Lasagna gardening method was popularized in the 1990’s through Patricia Lanza’s book ‘Lasagna Gardening’ (What did you think it would be called?)!
Concept of Lasagna Gardening
Lasagna gardening involves building up the soil by adding alternate layers of carbon-rich and nitrogen-rich organic layers that over the course of time is broken down by beneficial microbes, insects and earthworms to give rich, fluffy soil that will make your plants thrive! Doesn’t that sound great? You don’t have to double dig or till the soil in your garden. You don’t have to remove existing weeds and grass. In fact, you don’t really have to bend your back and do anything to the soil!
The concept of Lasagna gardening actually mimics nature’s way of enriching the soil! Think of a field where grass and random plants grow. In the course of a season, a time comes when the plants dry out and decay and are covered by falling leaves. Animal manure and fruits lay sprawled over the ground. These can be classified into separate layers on the ground and when rain comes pouring, an ideal environment is achieved and enriched soil is formed.
In Lasagna gardening you get to manipulate the soil you create by choosing to add various combinations of layers. Building a Lasagna garden is very much similar to building a compost pile. Like a good compost pile, your Lasagna bed should contain a healthy mix of various types of organic matter.
Materials
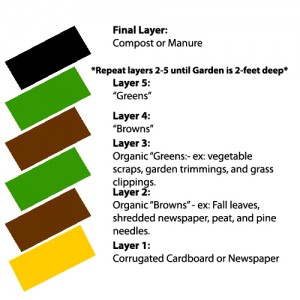
A rule of thumb that every gardener should know while creating the various layers is that the carbon-rich (“browns”) layer be at least twice as deep as the nitrogen-rich (“greens”) layer.
Browns are dry dead stuff including dry leaves, straw, hay, shredded newspaper, peat, pine needles and small twigs and wood chips.
Greens are grass and garden clippings, kitchen compost, leftover fruits and vegetables, egg shells and manure from herbivores. Using animal meats or any type of fats is a strict no. You don’t want maggots in your soil!
When to Build Your Lasagna Garden
Anytime you like really!
Fall is the ideal time though, since the amount of organic material available for free is aplenty! Then as you let it sit through the winter, by the time spring arrives you will have rich and fertile soil waiting to be used.
If you want to start a Lasagna garden during spring or summer, the only tweak you would have to make is adding more “soil-like” layers to the bed like top-soil or peat. This is because there isn’t enough time for the microbes to work on your layers before you can plant!
Building a Lasagna Garden
Plan your crops and select a spot: As with any garden, planning what you want to grow in advance is essential. Do some research and get advice from fellow gardeners to find out what vegetables do well in your area. Take into account amount of sunlight, irrigation, pest problems etc. while deciding the space.
Assemble your Lasagna plot: Creating a Lasagna garden is a lot like dinner-time lasagna! Yup, you get to customize the ingredients to match your taste. Now that you know what you can layer with, here’s how to assemble your plot.
1. Build the foundation: Lay down on your planned area 6 to 10 sheets of newspaper or 1 sheet of corrugated cardboard so that the entire grow area is covered. This thick under-layer should overlap at all the edges. Before proceeding soak this entire area thoroughly. Water helps keep the layer intact and sets the premises for earthworms and their likes. Do not use fully colored or glossy newspapers. This layer essentially blocks weeds and other unwanted plants from growing in the area.
2. Alternate following layers with nitrogen-rich and carbon-rich material: Here’s the best part! You get to fill the layers up just the way you like it! Just keep in mind the rule of twice as much carbon-rich as nitrogen-rich material!
Say you add a nitrogen-rich layer of manure about 2 inches deep. Add then, 4-6 inches of carbon-rich dry leaves etc. Chopping and shredding leaves, twigs and newspapers you add help a great deal cooking them up faster! While adding layers, do not compress them. Aerated layers do better during the decomposition phase.
Keep adding alternating layers till about 1or 2 feet or as you please! The mound will eventually shrink down over the course of months owing to decomposition of the layers by organisms so don’t worry about the pile being too high.
You can top it off with some top-soil or humus to provide a more soil like amendment. Some gardeners add pure compost and soil on top so that the mixture will have some sand, clay and minerals in addition to organic matter. You can add other minerals and nutrients to the bed at any point. Bone meal or fish bone meal adds phosphorous and calcium. Greensand or kelp meal add potash and trace minerals, rock dust adds trace minerals too.
3. Let it cook: Once you’re done with the layers, keep them moist as organisms thrive in such conditions. Covering the bed with a sheet of plastic weighed down on the sides helps not only in heating up and quickening the process but also in keeping out animals that could burrow through the bed and mess it up.
Each material in the bed has its own decomposition time. Hence the bed is best when all of it is decomposed.
4. Plant away: If you’ve used cardboards at the bottom, use a shovel to cut through it in many places so that roots can go through them. No need of digging. Just pull the soil apart, plant and cover up with soil.
People have put in plants right away in their Lasagna gardens and have been satisfied with the results. Waiting for months though will give you much better crops as the soil will be nice and rich!
Maintaining your Lasagna bed: Maintenance is pretty simple! Just add mulch (grass clippings, bark, and leaves, straw) to the top of the bed every now and then. Weed and water as necessary. That’s it! Enjoy your harvest!
Need seeds or starter plants? Check our online store!
Learning to cultivate vegetables during the colder seasons can help you save a lot of money on groceries and provide your family with fresh juicy produce straight from your garden! Cool weather vegetables generally grow best at temperatures ranging between 55 deg. F and 70 deg. F.
A realistic time to plant cold weather vegetable seeds in warm regions, would be from late summer to early fall when temperatures are falling for harvest in late fall, winter or early spring.
In areas that experience very cold winters, one must plant cold weather crops as soon as the soil is workable in the early days of spring.
To get amazing results, the crop has to be grown to maturity in the cold weather; otherwise, they could end up becoming bitter tasting, or even worse, bolt to seed rather than producing edible parts.
Here goes the list of cold weather vegetables that you should try out. I have provided known cold tolerant varieties where possible.
– Asparagus
– Beets- ‘Detroit Dark Red’, ‘Chioggia’
– Broccoli- ‘Waltham’, ‘De Cicco’, ‘Packman’
– Brussels Sprouts
– Chard- ‘Ruby Red’
– Carrots- ‘Romeo’, ‘Paris Market’
– Cabbage- ‘Rio Verde’, ‘Savoy’, ‘Flat Dutch’
– Celery
– Cauliflower
– Collards- ‘Vates’, ‘Top Bunch’, ‘Georgia’
– Kale-‘Dwarf Siberian’, ‘Redbor’, ‘Winterbor’
– Kohlrabi
– Lettuce- ‘Wine Country Mesclun’, ‘Speckled Trout Black’, ‘Red Leaf’
– Onion
– Turnips- ‘Purple Top’, ‘White Globe’, ‘Rapa da Orto’
– Spinach- ‘Bloomsdale Long Standing’, ‘Bordeaux’
– Radishes- ‘French Blush’, ‘Watermelon’
– Rhubarb
– Rutabagas
– Peas- ‘Alaska’, ‘Super Snappy’, ‘Oregon Giant’
If your area generally averages between 65 and 95 deg. F during the summer, then vegetables from the subtropical area, more commonly the warm weather crops are most suited to you! Summer crops are mostly the fruits borne by the plant as opposed to cool-seasons leafy veggies.
The key to growing vegetables that prefer heat is watering religiously. Water them frequently and adequately and you shall be satisfied with the fruit of your hard work when it’s time to harvest your yield! If you have areas in your garden that receive the full blast of the sun for 6 to 10 hours a day you can consider any of the following warm weather vegetables.
– Beans- Snake beans, Winged beans
– Corn
– Cucumbers
– Eggplant- ‘Black Beauty’, ‘Epic’, ‘Classic’
– Lettuce- ‘Black Seeded Simpson’
– Melons
– Okra
– Peppers- ‘Sweet Banana’, ‘Big Bertha’, ‘California Wonder’, ‘Long Red’, ‘Hungarian Wax’
– Pumpkins
– Sweet Potatoes
– Radish
– Squash- ‘Yellow Crookneck’, ‘Zucchini’, ‘Spaghetti’, ‘Straightneck’, ‘Scallop’
– Tomatoes- ‘Red Cherry’, ‘Sweet 100’, ‘Patio’, ‘Yellow Pear’, ‘Roma’, ‘Heartland’, ‘Heatwave’
– Tomatillos
– Watermelons
Many will claim that the most efficient way to grow a wide variety of crops is the French Intensive Raised Bed method, above all the French! Originally it was developed for the narrow back yard gardens in Paris, France in the early 1900’s, where working class people had little time and space. FIG is a very detail oriented method, wherein much more time is spent gardening than conventional methods, but the fruits of one’s labor; increased productivity and aesthetically beautiful arrangements, are very much satisfying to the patient gardener.
Creating the Raised Beds
Raised beds form the basis of this method. Preparation of the bed is naturally the most time consuming and labor intensive task. Raised beds typically 5 feet wide and 12 or more feet long with about 3 feet between beds are a characteristic of FIG. The bed has to be narrow enough for one to reach over to the center from either side, without of course stepping onto the bed! Plan and mark such beds out in your garden keeping in mind space in between for walking, wheelbarrows, irrigation etc.
The actual work begins now when you start digging up the ground. Double digging to create the raised beds is another feature of FIG method. It helps increase soil drainage and aeration. Double digging is basically shoveling off the top layer with a spade to form a trench in your marked bed layout and then digging the under layer with a fork. Moreover, a layer of fertilizer (horse manure) is added to the top-soil before digging to at least 12 inches deep, setting aside the dug soil for later use. Once you remove the top-soil, remove another 12 inches off the lower-soil and keep the dug soil aside. The excavated soil can be mixed with compost or other types of rich soil (in case your soil isn’t too good) and filled back into the same trench or another trench. Add compost to the bottom of the trench followed by a layer of dug soil and repeat till there are even layers of soil and compost (typically 3 with soil the top-most layer). Voila! You have a raised bed with better drainage than before while also increasing the surface area for plants to grow! Not only this, you will be able to pull out weeds very easily as their roots won’t have a good grip on the soil. Utmost care must be taken to not compress the bed by stepping on it as it would drastically decrease the functionality of the bed.
Once established, these raised beds do not require much maintenance! When not in use, add compost to the top and fluff up the top soil with a fork.
Planting and Watering
Optimal spacing is encouraged while planting and so is companion planting because it gets the most out of the close proximity of the plants in the bed. As with all types of gardens watering is essential. It is quite mandatory that FIG beds be watered intensely so that water penetrates deep into the bed.
Up to 4 times the produce per acre and ½ the water usage than conventional methods, this method has been claimed to achieve! Why don’t you try it and see yourself?
Did you know you could make use of any unused sunlit space in your back yard to grow an intense patch of vegetables using the Square Foot Gardening (SFG) method to produce as much as you would if you were gardening conventionally, in an area 20 % lesser?!!
Yup! Ever since Mel Bartholomew popularized the phrase “Square Foot Gardening” in the early 1980’s it has been gaining recognition and acceptance from all over the globe, not least because it is a variation of the French Intensive Gardening (FIG) method that is widely regarded to be the most effective way to cultivate crops. This said the scope and effectiveness of the SFG method is actually second to none.
What is Square Foot Gardening?
SFG can be broadly defined as the practice of growing intensely packed crops in small raised beds that inculcates a simple system that can be adapted to experience, physical abilities and geographical locations.
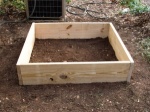
The method makes use of raised beds that are generally four sided boxes with no tops or bottoms to be placed in a location in the garden so as to contain a certain amount of soil. As the name suggests the raised beds are square shaped measuring 4 feet wide and 12 inches deep. However, gardeners have claimed that it is not necessary to use a container/box as a compound for the bed citing that the box has no significance other than being a frame support.
The bed would then be gridded into a number of square sections; each section accommodating a variety of different crops over time. Each square thus holds a number of plants depending on its size. For example, a tomato plant will occupy a whole square while there could be upto 16 radishes per square!
How to Start A Square Foot Garden
-Pick a Spot
As with any gardening method, the first thing to do is to plan and identify a place to begin your new adventure. Undoubtedly most vegetables and fruits thrive in sunlight, so find an area that receives at least 6 hours of direct sunlight a day. Keep in mind water sources too!
-Construct your bed
The next step is to make an excellent raised bed. Ideally you should create a 4 by 4 feet square box made of wood and stay true to the method! Get lumber from your local store, chop them and screw them together like in the picture. Use tools as you see fit! I do not want to hold you back.
What the bed should contain is up to you and what you want to grow. Generally good soil, compost and manure make up the bed.
-Planting
Plant in the square according to size and interchange the locations in the grid in successive planting seasons. In general, it is possible to have 1, 4, 9 and 16 plants in each square. You can always thin out the plants if you feel they are too tightly packed.
Good luck and click this link to a chart depicting the number of plants per square for different vegetables and fruits!


